


 Tweet
Tweet
This was actually posted in a secret place on the CR forums where the public can't get to it! But why, right? Well Storm just made a post, and then I expanded off it. Soon enough it was huge. So Storm pretty much demanded I make it public and send it well.. everywhere! Seriously. threatened me and everything! 
So.. here ya go
Storm's Post:
For those of you that have never heard the term "Skinning", or even know what "UPaint" is, allow me to explain....
Forgive me if any of this info is a bit incorrect, as I haven't touched UPaint in years and UT2004 may have a different method of using your characters...
Both UT2003 and UT2004 come with a application called UPaint. It allows you to access any of the ingame character textures and re-paint them to your liking. Some maniacs out there know how to export from UPaint into Photoshop, work themselves up a masterpiece and then get the images back into UPaint and thus, they create gorgeous custom skins (like the Necris packs). Once you have your skin finished, the program goes through a compiling sequence which creates the "Portrait" and texture packages.
Now you must create the additional files (UPL and xPlayers) and here is where you tell UT where to find the "head", "Body", "Teamskins", the character's Bio, etc. If all goes well, you'll have created yourself a cool new character to share with the community.
Here's a look at what HeadHunter's UPL file looks like....
[Public]
Player=DefaultName="Head_Hunter",Mesh=Jugg.JuggMal eA,species=xGame.SPECIES_Jugg,Portrait=HeadHunter. HeadHunterPortrait,
Text=XPlayers.HeadHunter,Sex=Male,Menu="SP",Favori teWeapon=xWeapons.RocketLauncher,
BodySkin=HeadHunter.HeadHunterBody,FaceSkin=HeadHu nter.HeadHunterHead,Accuracy=-0.2,StrafingAbility=0.6,Tactics=0.5)
Here's a look at his "xPlayers" info...
HeadHunter=Name: Head Hunter|Age: 42|Race: Homo Sapien (Gene boosted)||Data:|Earth-born, from a country called Germany. This maniac is a true survivor and natural born killer.||He wears his old Terran military combat suit proudly when he competes. He may be aging, but keep your eyes on him, as you may find the name Head Hunter stamped into the base of next year's Championship trophy!||
-----------
Red's Post:
Nice first attempt Storm!
Way better than the standard recolor skins that you see everyone do.
Yeah, that'd be me.
It's actually easier than you might think though. I used to do it a really tricky way, where I could screen capture the images and crop them and whatever.. but you know what? you don't need that.
If you want to edit skins, and really seriously edit them with a program like photoshop or equal power, then you can grab the skins straight out of the spot where Upaint itself is getting them.
Program files>Right Hemisphere>Upaint>Textures
here, you'll find all the texture files which are in PNG format. They're full rez, and EXACTLY the same size that you need for importing them onto your model.
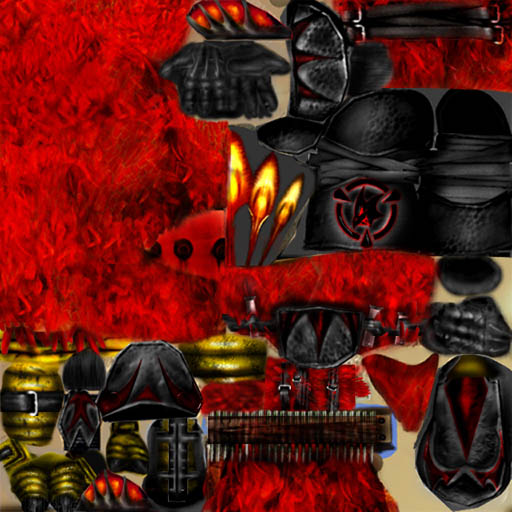
It can be confusing though, I mean have you ever really looked at these maps?

That is Nebri's body skin. Can you figure out whats going on there? Probably not. it's a pretty big mess.
This is where Upaint becomes invaluable, for me anyway.
I use Upaint to figure out where the hell everything is going.
For example: I want to paint on the tail.. well, where is the tail? So in Upaint I get a bright colored brush like neon pink, and i mark on the 3d model's tail. you will see that on the image map window for the body, it makes a pink mark on the spot where the tail is. And then aha! now I know. So i can go back into photoshop and work on the spot where i found it was.
Furthermore, some models are mapped completely different than others. The Nebri model for example, is almost entirely mirrored (paint on one side mirrors over to the other). But others like Romulus? Not so. It has it's own weirdness though. A grenade texture on his belt is the grenade texture for ALL grenades. That means if you decide to make one of them pink.. well, you can't, because they will ALL turn pink. These little issues are different from model to model, and it's very important that before you start texturing, you understand how ALL the coordinates are working. If you spent a ton of work making a shirt for Nebri that said "total noob" and then you tried to transfer that to the model, you'd be in for a painful surprise when you found out only half your texture showed, and the rest of it was mirrored horrifically while other pieces were scattered about the arms, legs, and whatever else.
KNOW your model bounds before you start tweaking them. And then discover even more as you work.
So at this point you're probably saying "RED! WHAT THE HELL! YOU SAID THIS WAS EASY!"
Well it still is! If you know how to use Photoshop or anything high end (hell, even paint works), this is a walk in the park. The complexity comes from what you decide to do.
Here is another example.
That is my remapped version of the nebri body map, to eventually make this character:
This, well this was a huge job and falls into that "maniac" category. 2 something weeks and basically a total remap. Very, very complicated stuff with lots of trail and error. But look, taking that same map just about, I made this.
How? Well with Upaint that would have been impossible. But photoshop? Very simple.
First, all the feather maps (that were red), are made green. This is as easy as sliding the hue/saturation bar around. Then doing similar things all over the whole model. very simple and quick selections of the legs to make them black, and so on. The face was the only thing really, that was that different. Aside from little tweaks on the gloves and losing the leg nitro vails, but you get the idea :wink:
Also, since i personally made the maps, i had them all on instantly editable layers. What came from it was I spent 2 weeks mapping red from scratch, but then had the power to create 6 other characters FROM that base map. And i made those characters all pretty much in 1 day.
Another example:
Looks hard, right? not so. That skin took maybe an hour or two, but only because of face tweaks. The outfit itself? Select pretty much everything, and lower the brightness, saturation, etc, and make it dark. Suddenly you have yourself a black skin which still looks slick. And it looks slick because you barely edited Epic's awesome mapping job, you just recolored it basically.
This is just the Romulus character, in case you can't tell. :wink:
So lets say you do this, and you're all ready to put the texture in.. but don't know how.
In Upaint, click on the window with the texture you're going to replace.
IE: body texture window to replace the body texture.
Then go to file>import texture.
Select your texture, load it up, and bam, done.
Now just do that for the head, if you made a head texture, and you're done!
Personally when i work on skins, I frequently load the new texture as i'm making it, onto the unreal model. I do this for 2 reasons:
1. because it helps me see how it's looking and i can instantly see problems that need to be fixed (screwy mapping, overlap, etc) before dedicating too much time to it. You don't want to spend a few hours mapping something, only to load it up and see that it's mapping all wrong due to some mirrored part you had no idea was there.
2. And because, it's damned satisfying to click a button and see the texture you made, appear on the model and be able to rotate around it and everything. Gives a sense of accomplishment! Even if you barely started.
From there you can do a few more things.
If you're all done, and want to see it in game, you can go to:
file>export character into unreal
and then Upaint will do everything for you. Including making a UPL file and texture files.
That works great if you just want the skin in game and don't care about thigs like a bio or a personal history in the data for your character.
If you do this, and want to share your character with others, all you need is:
the utx file from the textures folder
the ulp file from the system folder.
So to give Red to someone, I just get "Red.utx" and "Red.upl" and I'm done.
But what if you want those bio pictures and history things..?
Well that, requires use of UEd. And rather than explain all that to you, I direct you to the best damn tutorial i've ever found for it:
http://rallyrays.com/tutorials.htm
They're video downloads, but seriously.. you want to really learn the ins and outs of skinning? Get them. The tutorials are fantastic.
There is one more 3rd option to the skinning puzzle (actually 4, but it's one in the same), and that is going BEYOND skinning and making a custom model entirely.
Unfortunately, I can't tell you how to do that. I haven't tried that trick yet. that being making something totally from scratch. You'll see that in the Rally Tutorials, he did that. Well! I don't know how to do that just yet. So no luck there.
However, you can take existing UT characters and bring them into Max or Maya and edit the mesh there. Which is what I did to make me new version of Red:
Looking back up at the Nebri model, we can see whats different here.
She has a real beak now (and smile), she has head spikes, the horns on nebri are totally gone, longer feet, a bird's tail (it sucks, but it's there), and a few other tweaks (like making the gloves fit better) but hard to see here.
What did i do? I took the nebri character into max and just pulled at verts and scaled them all over the place. if i really knew how to make character from scratch and get them in, i could have deleted faces, and reskinned (in this case, making the skeleton conform to the mesh) the character. Since I didn't, though, this was as good as it got. You have to be careful if you do this, to not scale the mesh so far that it loses it's binding. You can for example.. scale the hands out to be giggantic and long.. but then the skelton will lose it's binding, and your model will not transfer.
You're NOT supposed to mess with the mesh at all after it's bound, but for simple editing purposes (and nothing serious) then it works fine.
But if you an even get that far, those are things you should know anyway! Because it's pretty much common knowledge for any 3d Artist.
Lastly, a note on this:
I just wanted to note that you don't actually have to mess with the xplayers file. Sometimes it makes it kind of a problem if you make people download an xplayers file with your packages because then they overwrite their OWN xplayers file.. and if they had a bunch of different people doing this, every new xplayers file would effectively overwrite the previous.. creating major problems for the engine when it looks for those old files.
So! To avoid this? Just don't use xplayers at all.
Plus, it's easier just to edit one file, i think.
Just edit a UPL file, preferably the one you make when you export the character to unreal from upaint.
Example: if you make a character in upaint called "the_dude", and you export that character, it will make a utx texture file in the textures folder called "the_dude.utx" and then in the system folder (in the UT2004 directory) called "the_dude.upl"
Open this upl and edit it to work. Since you exported it from upaint, you shouldn't have to tell it where anything else. All you edit is the Bio.
Player=(DefaultName="Red",Mesh=Red2An.Red2,species =xGame.SPECIES_Alien,Portrait=Red2Tx.Red_Bio,Text= "Name: Red|Age: ?|Race: Bird||Data:|Red joined the tournament after hearing of a place where you could actually legally 'blow shit up and splatter people to pieces'. Not many people know what she's all about, but things are certain: 1. She's psychotic. 2. She's an explosives nut. Her wings were bound for the tournament, to keep her from flying, but she says 'It was a small price to pay! Finally, I can have a total blast and not get cops on my ass for it!' Oh, and never call her chicken. "AlienFemaleBB,Sex=Female,BodySkin=Red2Tx.Red_Body2 ,FaceSkin=Red2Tx.Red_Head2,StrafingAbility=0.5,Acc uracy=0.3)
That should be all you edit, assuming it all went right.
I prefer this because then you only edit ONE file, and it's all very easy. By the way, if that part was confusing, don't worry, that rally demo tutorial(s) explains this in full. Covered in the 4th video.
Well that should cover it. Heh, now i've gone ahead and made a giggantic post teaching stuff too. Whoops!
Hope you found that all useful. Feel free to hit me back for any questions and such that you have. And happy skinning!
So.. here ya go
Storm's Post:
For those of you that have never heard the term "Skinning", or even know what "UPaint" is, allow me to explain....
Forgive me if any of this info is a bit incorrect, as I haven't touched UPaint in years and UT2004 may have a different method of using your characters...
Both UT2003 and UT2004 come with a application called UPaint. It allows you to access any of the ingame character textures and re-paint them to your liking. Some maniacs out there know how to export from UPaint into Photoshop, work themselves up a masterpiece and then get the images back into UPaint and thus, they create gorgeous custom skins (like the Necris packs). Once you have your skin finished, the program goes through a compiling sequence which creates the "Portrait" and texture packages.
Now you must create the additional files (UPL and xPlayers) and here is where you tell UT where to find the "head", "Body", "Teamskins", the character's Bio, etc. If all goes well, you'll have created yourself a cool new character to share with the community.
Here's a look at what HeadHunter's UPL file looks like....
[Public]
Player=DefaultName="Head_Hunter",Mesh=Jugg.JuggMal eA,species=xGame.SPECIES_Jugg,Portrait=HeadHunter. HeadHunterPortrait,
Text=XPlayers.HeadHunter,Sex=Male,Menu="SP",Favori teWeapon=xWeapons.RocketLauncher,
BodySkin=HeadHunter.HeadHunterBody,FaceSkin=HeadHu nter.HeadHunterHead,Accuracy=-0.2,StrafingAbility=0.6,Tactics=0.5)
Here's a look at his "xPlayers" info...
HeadHunter=Name: Head Hunter|Age: 42|Race: Homo Sapien (Gene boosted)||Data:|Earth-born, from a country called Germany. This maniac is a true survivor and natural born killer.||He wears his old Terran military combat suit proudly when he competes. He may be aging, but keep your eyes on him, as you may find the name Head Hunter stamped into the base of next year's Championship trophy!||
-----------
Red's Post:
Nice first attempt Storm!
Way better than the standard recolor skins that you see everyone do.
Some maniacs out there know how to export from UPaint into Photoshop, work themselves up a masterpiece and then get the images back into UPaint and thus, they create gorgeous custom skins
It's actually easier than you might think though. I used to do it a really tricky way, where I could screen capture the images and crop them and whatever.. but you know what? you don't need that.
If you want to edit skins, and really seriously edit them with a program like photoshop or equal power, then you can grab the skins straight out of the spot where Upaint itself is getting them.
Program files>Right Hemisphere>Upaint>Textures
here, you'll find all the texture files which are in PNG format. They're full rez, and EXACTLY the same size that you need for importing them onto your model.
It can be confusing though, I mean have you ever really looked at these maps?
That is Nebri's body skin. Can you figure out whats going on there? Probably not. it's a pretty big mess.
This is where Upaint becomes invaluable, for me anyway.
I use Upaint to figure out where the hell everything is going.
For example: I want to paint on the tail.. well, where is the tail? So in Upaint I get a bright colored brush like neon pink, and i mark on the 3d model's tail. you will see that on the image map window for the body, it makes a pink mark on the spot where the tail is. And then aha! now I know. So i can go back into photoshop and work on the spot where i found it was.
Furthermore, some models are mapped completely different than others. The Nebri model for example, is almost entirely mirrored (paint on one side mirrors over to the other). But others like Romulus? Not so. It has it's own weirdness though. A grenade texture on his belt is the grenade texture for ALL grenades. That means if you decide to make one of them pink.. well, you can't, because they will ALL turn pink. These little issues are different from model to model, and it's very important that before you start texturing, you understand how ALL the coordinates are working. If you spent a ton of work making a shirt for Nebri that said "total noob" and then you tried to transfer that to the model, you'd be in for a painful surprise when you found out only half your texture showed, and the rest of it was mirrored horrifically while other pieces were scattered about the arms, legs, and whatever else.
KNOW your model bounds before you start tweaking them. And then discover even more as you work.
So at this point you're probably saying "RED! WHAT THE HELL! YOU SAID THIS WAS EASY!"
Well it still is! If you know how to use Photoshop or anything high end (hell, even paint works), this is a walk in the park. The complexity comes from what you decide to do.
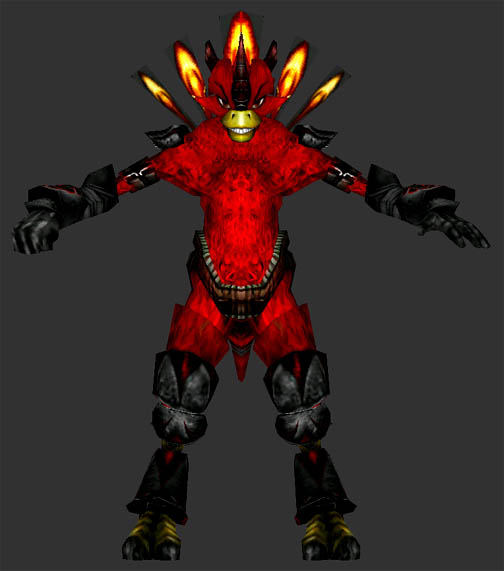
Here is another example.
That is my remapped version of the nebri body map, to eventually make this character:
This, well this was a huge job and falls into that "maniac" category. 2 something weeks and basically a total remap. Very, very complicated stuff with lots of trail and error. But look, taking that same map just about, I made this.
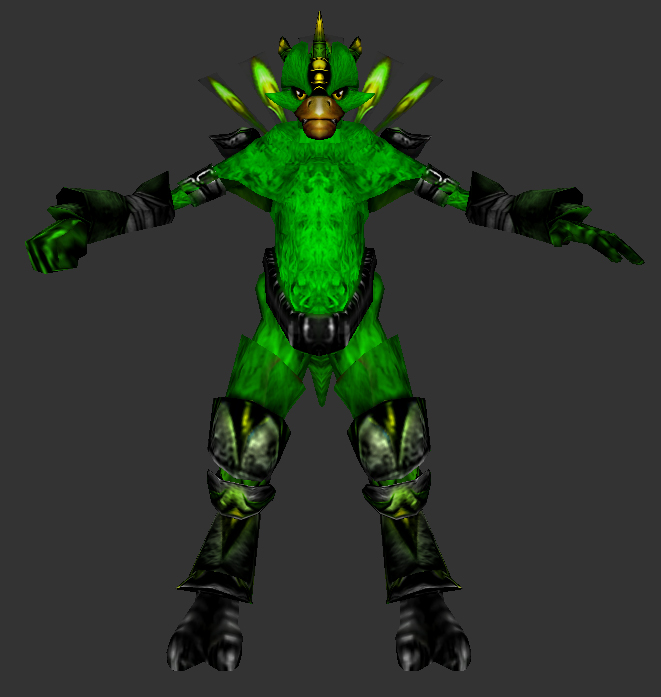
How? Well with Upaint that would have been impossible. But photoshop? Very simple.
First, all the feather maps (that were red), are made green. This is as easy as sliding the hue/saturation bar around. Then doing similar things all over the whole model. very simple and quick selections of the legs to make them black, and so on. The face was the only thing really, that was that different. Aside from little tweaks on the gloves and losing the leg nitro vails, but you get the idea :wink:
Also, since i personally made the maps, i had them all on instantly editable layers. What came from it was I spent 2 weeks mapping red from scratch, but then had the power to create 6 other characters FROM that base map. And i made those characters all pretty much in 1 day.
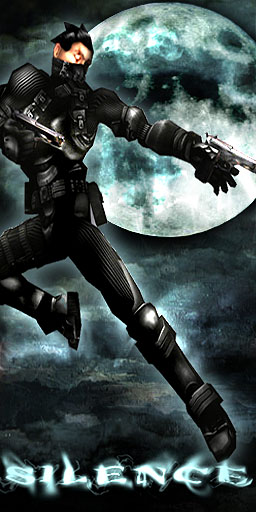
Another example:
Looks hard, right? not so. That skin took maybe an hour or two, but only because of face tweaks. The outfit itself? Select pretty much everything, and lower the brightness, saturation, etc, and make it dark. Suddenly you have yourself a black skin which still looks slick. And it looks slick because you barely edited Epic's awesome mapping job, you just recolored it basically.
This is just the Romulus character, in case you can't tell. :wink:
So lets say you do this, and you're all ready to put the texture in.. but don't know how.
In Upaint, click on the window with the texture you're going to replace.
IE: body texture window to replace the body texture.
Then go to file>import texture.
Select your texture, load it up, and bam, done.
Now just do that for the head, if you made a head texture, and you're done!
Personally when i work on skins, I frequently load the new texture as i'm making it, onto the unreal model. I do this for 2 reasons:
1. because it helps me see how it's looking and i can instantly see problems that need to be fixed (screwy mapping, overlap, etc) before dedicating too much time to it. You don't want to spend a few hours mapping something, only to load it up and see that it's mapping all wrong due to some mirrored part you had no idea was there.
2. And because, it's damned satisfying to click a button and see the texture you made, appear on the model and be able to rotate around it and everything. Gives a sense of accomplishment! Even if you barely started.
From there you can do a few more things.
If you're all done, and want to see it in game, you can go to:
file>export character into unreal
and then Upaint will do everything for you. Including making a UPL file and texture files.
That works great if you just want the skin in game and don't care about thigs like a bio or a personal history in the data for your character.
If you do this, and want to share your character with others, all you need is:
the utx file from the textures folder
the ulp file from the system folder.
So to give Red to someone, I just get "Red.utx" and "Red.upl" and I'm done.
But what if you want those bio pictures and history things..?
Well that, requires use of UEd. And rather than explain all that to you, I direct you to the best damn tutorial i've ever found for it:
http://rallyrays.com/tutorials.htm
They're video downloads, but seriously.. you want to really learn the ins and outs of skinning? Get them. The tutorials are fantastic.
There is one more 3rd option to the skinning puzzle (actually 4, but it's one in the same), and that is going BEYOND skinning and making a custom model entirely.
Unfortunately, I can't tell you how to do that. I haven't tried that trick yet. that being making something totally from scratch. You'll see that in the Rally Tutorials, he did that. Well! I don't know how to do that just yet. So no luck there.
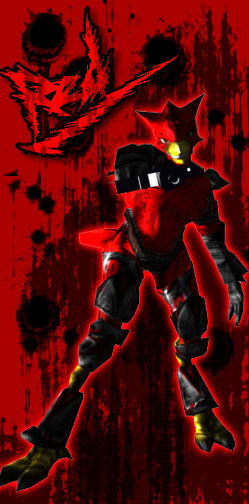
However, you can take existing UT characters and bring them into Max or Maya and edit the mesh there. Which is what I did to make me new version of Red:
Looking back up at the Nebri model, we can see whats different here.
She has a real beak now (and smile), she has head spikes, the horns on nebri are totally gone, longer feet, a bird's tail (it sucks, but it's there), and a few other tweaks (like making the gloves fit better) but hard to see here.
What did i do? I took the nebri character into max and just pulled at verts and scaled them all over the place. if i really knew how to make character from scratch and get them in, i could have deleted faces, and reskinned (in this case, making the skeleton conform to the mesh) the character. Since I didn't, though, this was as good as it got. You have to be careful if you do this, to not scale the mesh so far that it loses it's binding. You can for example.. scale the hands out to be giggantic and long.. but then the skelton will lose it's binding, and your model will not transfer.
You're NOT supposed to mess with the mesh at all after it's bound, but for simple editing purposes (and nothing serious) then it works fine.
But if you an even get that far, those are things you should know anyway! Because it's pretty much common knowledge for any 3d Artist.
Lastly, a note on this:
Now you must create the additional files (UPL and xPlayers
So! To avoid this? Just don't use xplayers at all.
Plus, it's easier just to edit one file, i think.
Just edit a UPL file, preferably the one you make when you export the character to unreal from upaint.
Example: if you make a character in upaint called "the_dude", and you export that character, it will make a utx texture file in the textures folder called "the_dude.utx" and then in the system folder (in the UT2004 directory) called "the_dude.upl"
Open this upl and edit it to work. Since you exported it from upaint, you shouldn't have to tell it where anything else. All you edit is the Bio.
Player=(DefaultName="Red",Mesh=Red2An.Red2,species =xGame.SPECIES_Alien,Portrait=Red2Tx.Red_Bio,Text= "Name: Red|Age: ?|Race: Bird||Data:|Red joined the tournament after hearing of a place where you could actually legally 'blow shit up and splatter people to pieces'. Not many people know what she's all about, but things are certain: 1. She's psychotic. 2. She's an explosives nut. Her wings were bound for the tournament, to keep her from flying, but she says 'It was a small price to pay! Finally, I can have a total blast and not get cops on my ass for it!' Oh, and never call her chicken. "AlienFemaleBB,Sex=Female,BodySkin=Red2Tx.Red_Body2 ,FaceSkin=Red2Tx.Red_Head2,StrafingAbility=0.5,Acc uracy=0.3)
That should be all you edit, assuming it all went right.
I prefer this because then you only edit ONE file, and it's all very easy. By the way, if that part was confusing, don't worry, that rally demo tutorial(s) explains this in full. Covered in the 4th video.
Well that should cover it. Heh, now i've gone ahead and made a giggantic post teaching stuff too. Whoops!
Hope you found that all useful. Feel free to hit me back for any questions and such that you have. And happy skinning!


Comment